
How to Add Custom Font in Squarespace: A 5-Step Guide [2024]
Chances are, when you’re building a Squarespace website, you’re going to want to add specific branding.
You want your Squarespace website to mirror the rest of your online and offline presence, and that means using the same colours, styles, and fonts.
A problem that often arises, though, is that there’s actually no way to upload your own custom fonts to Squarespace; you have to use one of the fonts the platform offers.
Or do you?
With some tweaks, you can add custom fonts to Squarespace websites to ensure they tie in with your wider branding. Read on to find out more.

How to Add Fonts to Squarespace in 5 Steps
While Squarespace primarily offers you an easy way to change your website’s font, with even options to use external fonts from Adobe, you’ll discover there isn’t a straightforward process to add a font you own.
Still, you can upload custom fonts to Squarespace, and here are the steps involved:
Prepare your custom font.
Upload custom fonts to Squarespace.
Add CSS to apply your custom font.
Style your custom fonts.
Save and preview your changes.
I’ll go into more detail in the following sections. Alternatively, you can check out the below video for a visualised description of how to add custom font to squarespace.
Watch the video
Check out the YouTube video below 👇
Step 1: Prepare your custom font.
Before you can add a custom font to Squarespace, you need to ensure you have the font file readily available. This file should be in either OTF, TTF, or WOFF format.
If you haven’t purchased a custom font yet, there are various resources available online where you can find both free and premium fonts. Once you have your font file, you’re ready to proceed to the next step.
Step 2: Upload custom fonts to Squarespace.
To upload font to Squarespace, log in to your account and click on “Website” from the left menu.

Next, scroll down and locate “Website Tools” under “Utilities.” Select it to proceed.

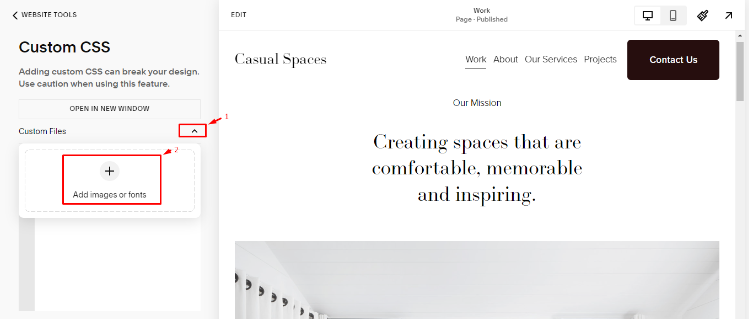
Next, click on “Custom CSS” to access the custom CSS box.

Click the drop-down arrow beside the “Custom Files” menu, select “Add Images or Fonts,” and locate your custom font file from your computer.
Click on the font file once uploaded to generate a URL. Copy this URL, as you’ll need it in the next step.

Step 3: Add CSS to apply your custom font.
Now that your file is uploaded to Squarespace, you need to use CSS to apply it to your website to add font to Squarespace.
Here’s how you can do it:
In your custom CSS panel, you need to add the following lines of code:
@font-face {
font-family: ‘NAME’;
src: url(’URL’);
}
h1, h2, h3, h4, p {
font-family: ’NAME’;
}
The first section of the code includes the name you’re giving the font and the URL where you’re grabbing the custom font from.
The second part focuses on where you want to apply the custom font to, e.g., H1, H2, H3, etc.
Replace ‘NAME’ with the font name you want to assign to your custom font. Make sure to use a name you’ll remember. Then, replace ‘URL’ with the font file URL you copied in step #2.
You also need to make sure you add the font family name to the second part of the code, i.e., the areas you’re targeting, to ensure the font is changed.
If you want to add another custom font to target a different text type, simply duplicate the code, editing the font family name and font URL.
This code is ideal if you want to use a font different from the basic Adobe fonts that Squarespace provides; in fact, it’s the only way to include a custom font on your Squarespace website.
Whilst it may not be the simplest way to change the font of your website text, once you’ve got the hang of editing the code you should find it relatively easy.
Have a play around with different fonts and styles targeting different text types, and be sure to check out the rest of the byCrawford Squarespace resources for more Squarespace tips and tricks.
Step 4: Style your custom fonts.
Now that your custom font is applied to your site styles, you can further customise its appearance using CSS.
Here are a few examples of how you can style or change your custom font settings:
a. Adjusting Font Size:
h1 {
font-size: 36px;
}
p {
font-size: 16px;
}
b. Changing Font Weight
h2 {
font-weight: bold;
}
h3 {
font-weight: 500;
}
c. Adding Letter Spacing
h4 {
letter-spacing: 2px;
}
p {
letter-spacing: 1px;
}
Feel free to experiment with different CSS properties to achieve the desired look for your custom fonts.
Step 5: Save and preview your changes.
Once you have applied all the CSS for your custom fonts, make sure to save your changes in the CSS editor. Then, click on the “Preview” button to see how your own custom font style looks on your Squarespace website.
If everything appears as expected, congratulations! You have successfully added and styled custom fonts on Squarespace 7.1.
5 Benefits of Adding Custom Font in Squarespace
Adding custom font to Squarespace websites can offer several perks, including:
Unique branding
Improved user experience
Enhanced design flexibility
Increased recognition
Better accessibility
1. Unique Branding
By using a custom font, you can enhance your website’s design and create a unique visual identity that aligns with your brand. Custom fonts allow you to stand out from competitors and create a consistent brand experience across all your online platforms.
2. Improved User Experience
Choosing a font that’s easy to read and visually appealing can enhance the overall user experience of your website. You can select custom fonts to match the tone and style of your content, making it more engaging and enjoyable for visitors to read.
3. Enhanced Design Flexibility
With custom fonts, you have more design flexibility and can create a website that truly reflects your vision. You can choose fonts that complement your website’s layout, images, and other design elements, resulting in a cohesive and visually appealing website.
4. Increased Recognition
Using a custom font can help reinforce your brand identity and make your website more recognisable. Consistently using a unique font across your website and other marketing materials can help users associate that font with your brand, increasing brand recognition and recall.
5. Better Accessibility
Custom fonts can also contribute to improved accessibility on your website. You can choose fonts that are designed for better readability, ensuring that all visitors, including those with visual impairments, can easily access your content.
Tip: Note that while adding custom fonts can be beneficial, it’s essential to choose fonts that are legible and compatible across different devices and browsers. Additionally, consider the licensing rights and ensure that you have the necessary permissions to use the custom font on your website.
Frequently Asked Questions
Can you choose custom fonts in Squarespace?
You can add external fonts from Adobe or more Squarespace custom font styles to your website using CSS styling. Simply follow the steps outlined in this guide.
How do I import custom fonts?
To import custom fonts in Squarespace, follow these steps:
Open the Squarespace dashboard and select your site.
Click on “Website,” then scroll down and click on “Website Tools.”
Select “Custom CSS.”
Scroll down to the bottom and click on the drop-down arrow beside “Custom Files” to manage Custom Files.
Upload font to Squarespace.
Once the font file is uploaded, you can use CSS styling to apply the custom font to different elements on your Squarespace website.
How do I add a custom font to a button in Squarespace?
To add a custom font to a button in Squarespace, follow these steps:
Log in to your Squarespace account and select the “Website” tab.
Locate “Website Tools” and select “Custom CSS.”
Click on the “Custom Files” drop-down menu and choose your font files.
Once your font files are uploaded, you can use CSS styling to apply the custom font to your button. To do this, add the following code to your existing line of code.
.sqs-block-button-element {
font-family: ‘NAME’ !important;
}
Remember to use the ‘font-family’ property to specify your custom font.
Conclusion
Adding custom fonts to Squarespace allows you to create a unique and personalised design that aligns with your brand identity. By following the step-by-step guide outlined in this article, you can easily upload a custom font to Squarespace. If you like to occasionally try out a custom font, Squarespace gives you the flexibility to do so. So, go ahead and make your website stand out with the perfect custom font that truly represents your brand!
Your designer
I’m Sam, an award-winning Squarespace web designer. I have worked with every type of business, building platforms for solo entrepreneurs through to multi-million-dollar corporations. If you want to discuss a potential project, you can email me at sam@bycrawford.com or get in touch with me here. Alternatively, you can book a free 15-minute consultation call here.


![How to Create a Blog on Squarespace [2024 Updated Guide]](https://images.squarespace-cdn.com/content/v1/5f53b4dad693da2d34e4e397/1714717173513-VJRULO4YYKAH3K8G62CS/image-asset.jpeg)
![How to Create a Squarespace Video Gallery [2024 Guide]](https://images.squarespace-cdn.com/content/v1/5f53b4dad693da2d34e4e397/1714675731827-UFKWVTWFOSNM49TZXS5B/image-asset.jpeg)
![Hide Header and Footer on One Page Only on Squarespace [NO-CODE UPDATE]](https://images.squarespace-cdn.com/content/v1/5f53b4dad693da2d34e4e397/1714216709774-JISY11KWQP798EX0JQNQ/image-asset.jpeg)


![How to Hide a Page on Squarespace [2024 Step-by-Step Guide]](https://images.squarespace-cdn.com/content/v1/5f53b4dad693da2d34e4e397/1714718816812-VG7Q54ICWO439K3FNHSN/image-asset.jpeg)


![Squarespace Contact Forms UPDATE [New Features Released]](https://images.squarespace-cdn.com/content/v1/5f53b4dad693da2d34e4e397/1712484570192-AUWBT0LE3G5Q45UF7BCZ/image-asset.jpeg)


![Add a Vertical Line to a Page on Squarespace [Easy Code]](https://images.squarespace-cdn.com/content/v1/5f53b4dad693da2d34e4e397/1711553569468-Y5OR2YS3HSLAYUEALVG6/image-asset.jpeg)


![[NEW FEATURE] Add Paywall to a Squarespace Blog](https://images.squarespace-cdn.com/content/v1/5f53b4dad693da2d34e4e397/1711129428606-83ZUXS4NUKQE0QGXDSUT/image-asset.jpeg)
![How to Show a Different Image on Hover [Squarespace Code Tutorial]](https://images.squarespace-cdn.com/content/v1/5f53b4dad693da2d34e4e397/1711129257275-P3IEYMXRMEW1O69KDWK3/image-asset.jpeg)
![Search Entire Squarespace Dashboard [Keyboard Trick]](https://images.squarespace-cdn.com/content/v1/5f53b4dad693da2d34e4e397/1711129068323-GBKXEUZYA7TF56LN5UQB/image-asset.jpeg)